 Posted on August 6, 2019
 by mcohen
  0
0 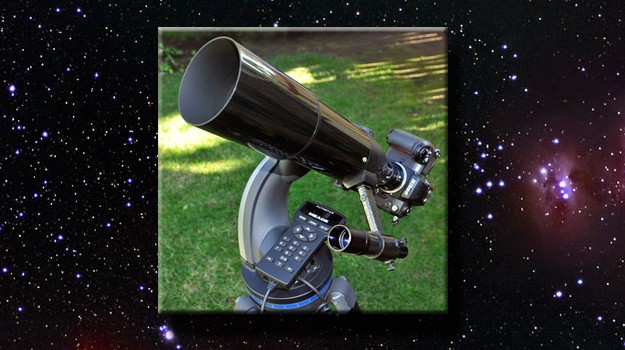
Many years ago, before digital photography revolutionized the medium, taking a beautiful shot of the Andromeda Galaxy (M31), or even a detailed image of the moon, showing its many craters, rilles and mountains would only be possible if you had a large wallet and access to highly specialized equipment and techniques. For the average amateur astronomer it was entirely out of reach.
With high-end telescopes now being mass produced, new optical designs and most importantly, the digital camera in combination with brilliant new software solutions that dramatically increase the quality of the images, the popularity of astrophotography has increased exponentially over the past two decades. What was virtually impossible twenty years ago is now available to anybody with a passionate interest and willingness to spend long hours perfecting the art of celestial imaging.
 50mm Achromatic Refractor") I was thirteen when I received my first telescope, a Polarex (Unitron) 50mm achromatic refractor. It was a present from my maternal grandmother and I remember clearly how impressed I was with its beauty and quality. Both my parents were supportive of my new hobby, but whereas my dad would take a quick look at Saturn and continue whatever he was in the midst of, I could not get enough of it – I spent hours and hours behind my little telescope, never tiring of the ever changing views that the moon would offer, the rings of Saturn and the four largest moons of Jupiter.
I was thirteen when I received my first telescope, a Polarex (Unitron) 50mm achromatic refractor. It was a present from my maternal grandmother and I remember clearly how impressed I was with its beauty and quality. Both my parents were supportive of my new hobby, but whereas my dad would take a quick look at Saturn and continue whatever he was in the midst of, I could not get enough of it – I spent hours and hours behind my little telescope, never tiring of the ever changing views that the moon would offer, the rings of Saturn and the four largest moons of Jupiter.
 I soon began taking pictures through my scope, first by simply holding my camera behind the eyepiece, and later with an inexpensive Russian reflex camera (Zenith B), using a special adapter for eyepiece projection (see photo). This technique uses the same eyepiece you look through to project an image on the film or sensor of your camera. It is a great way to shoot the moon and the planets.
By that time, I had also built my first darkroom and I started to experiment with specialty film developers (like Acufine and Diafine) to push my Kodak Tri-X film to ISO 1600. The results were actually quite decent (see samples), considering the fact that it was only a 50mm refractor without motor drive or anything. I exposed the film by opening the camera shutter and then moving a black piece of cardboard in front of the telescope, briefly uncovering the lens, so vibrations from shutter and mirror would be minimized. I cherish that little telescope to this day and last year completely refinished its beautiful wooden case (which over half a lifetime was pretty badly beaten up).
Fast forward to 2011. I have moved from my native Amsterdam, Holland, to the west coast of the United States, where I make a living as a photographer. My passion for the stars was lying dormant for a long time. Then, about two years ago, the itch to take some new photos of the moon (37 years after those romantic days of Tri-X developed in Acufine!) got ignited when I won a bid on Ebay for a Meade 90mm GoTo refractor at a great price.
Very quickly, I discovered that my Photoshop skills were a real asset in getting the maximum out of this modest telescope. After a few efforts, using the same eyepiece projection techniques that I used as a kid in Amsterdam, I was able to come up with very sharp images that looked as good as some of the shots I had seen by the “big boys” in the early seventies– shot with a scope I had bought for less than $100! (click here for samples)
In March of last year, I bought a large Dobsonian (10-inch mirror, f/5), brand new on Ebay, again for very little money. I was curious to see what the larger aperture would do for my moon shots and indeed, without any tracking, using a wireless remote for the shutter and flipping up the mirror of my Nikon (to minimize vibrations), I got some very detailed images.
There are several myths regarding equipment for astrophotography that are still going around:
MYTH #1: in order to take sharp photographs of the moon, you need an expensive scope with motor drive, to track the motion of the moon along the night sky.
Not so. At an exposure of 1/30 sec, the movement of the moon along the sky is less than 0.5 arc second, well below the resolution of most amateur instruments. Shooting at ISO 400 to ISO 800, which I consider the best range for the moon, there is enough leeway to extend your focal length all the way to f/45; if your lens or mirror has a 10cm (4”) diameter, the effective focal length can be as long as 4.5 meter (15 feet). It is best to shoot when the moon is high in the sky, otherwise turbulence increases and clarity suffers.
Here are some rough exposure guidelines for the moon:
| Crescent Moon | f/32 | ISO 800 | 1/30 sec |
| First and Last Quarter | f/45 | ISO 400 | 1/30 sec |
| Full Moon | f/45 | ISO 400 | 1/125 sec |
 Personally, I like to use eyepiece projection, but a good Barlow works just as well, especially with telescopes that already have a long focal length. The pixels in the sensor of your DSLR (= digital single lens reflex camera) will not be able to register the finest detail of your telescope if you shoot prime focus, particularly with the shorter and faster type Newtonian telescopes. Of course, you cannot frame the whole moon using those long focal lengths, so if your goal is to show the full disc, you have to piece them together from the detail shots in Photoshop, like I did with the photograph to the left (click on photograph to see more detailed samples, shot with a 10-inch Dobsonian).
In summary, taking photographs of the moon is relatively easy. All you need is:
- a simple telescope with a mount that provides good support
- a digital camera, preferably a DSLR (a used Canon EOS is fine)
- an eyepiece projection adapter to attach your camera to the telescope
- a so-called T-ring that is specific to your camera
- a wireless remote to trigger your camera shutter
Look around for the best deals on telescopes- here is a fantastic one at Optics Planet: Celestron Powerseeker 80 EQ.
The T-rings are around $15, like this one for a Canon EOS: Celestron T-Ring for Canon EOS Camera.
And here is a very nice wireless remote, available for a multitude of cameras (here for the EOS): Wireless Remote Switch. This one is compatible with Canon 1D/1DS, EOS 5D/5D Mark II, 50D, 40D, 30D, 20D, 10D, 7D, and D60. Also, here is a super inexpensive one that only works for selector models that have an IR receiver built in: IR Wireless Remote Control.
Let’s cover the process step-by-step: first, you place your eyepiece in the camera adapter (best to start with a 20 or 25 mm eyepiece since it gives you a wider field) and then attach it to the camera and the telescope. Set the camera to ISO 400 or 500 for half moon – which shows the most craters. If the moon is almost full, ISO 100 or 200 is plenty and for a small crescent, ISO 800 works well. Now focus your telescope as precisely as you can through the viewfinder of, even better, using LiveView on the display screen. In order to avoid a blurry image caused by the shock of the mirror, it is advisable to lock the mirror before taking the shot. You can experiment with exposures between 1/15 and 1/60 of a second in manual mode. I don’t recommend using automatic exposure, but sometimes it works quite well. Using a wireless remote will help keep everything steady, since touching the camera can cause vibrations.
If preferred, you can shoot in prime focus or with a Barlow lens by connecting the front part of the adapter directly to your camera (using the T-ring). So you leave the part with the eyepiece out altogether. That way, the exposures will be even shorter and you can easily capture the whole moon instead of a partial disc. It takes practice to get great results but you will be surprised how many craters will show even in your very first attempts.
Deep Sky Photography
With my newly reawakened interest for the night sky, it was only logical that I wanted to extend my efforts to Deep Sky objects as well as the planets. But how on earth was I going to do that with my very limited equipment? By now, I had seen gorgeous photos of nebulas and star clusters, taken by experienced amateurs with apochromatic refractors and high-end Newtonians or Schmidt-Cassegrain systems (the difference between these telescopes will be explained later in the article). They always used sturdy equatorial mounts with precise motor drives to track the night sky and achieve pinpoint stars. I was fairly convinced that I would need to invest some serious money in order to produce similar results.
MYTH #2: in order to photograph nebulas, star clusters and other Deep Sky objects, you need an equatorial mount, with motor drive and a guide scope, to allow for sufficiently long exposures.
I need to be perfectly clear: if you can afford a good equatorial mount with precise tracking capability, there is no question that your images will benefit from the more sophisticated equipment. However, these days it has become entirely possible to create powerful images of our amazing universe with fairly basic means, like a simple GoTo Alt-Az mount.
Here is my list of imperatives to reach good results without the big bucks:
- A dark site, far away from city lights
- A fast lens or telescope (f/5.6 or faster)
- A tracking mechanism, Alt-Az is fine, equatorial is better
- Deep Sky Stacking software
- Basic knowledge of Photoshop
- A good DSLR, allowing settings from ISO 400 to ISO 3200
- Patience and the willingness to spend many hours in the dark
The Dark Site
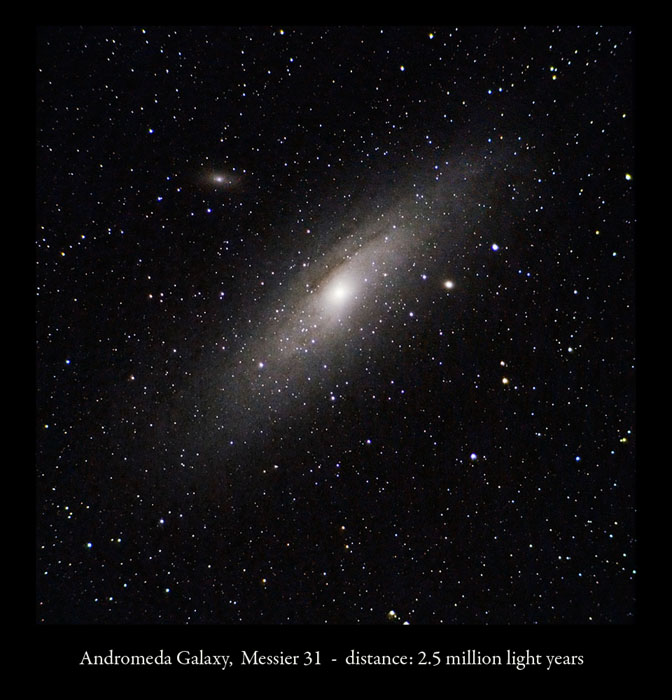
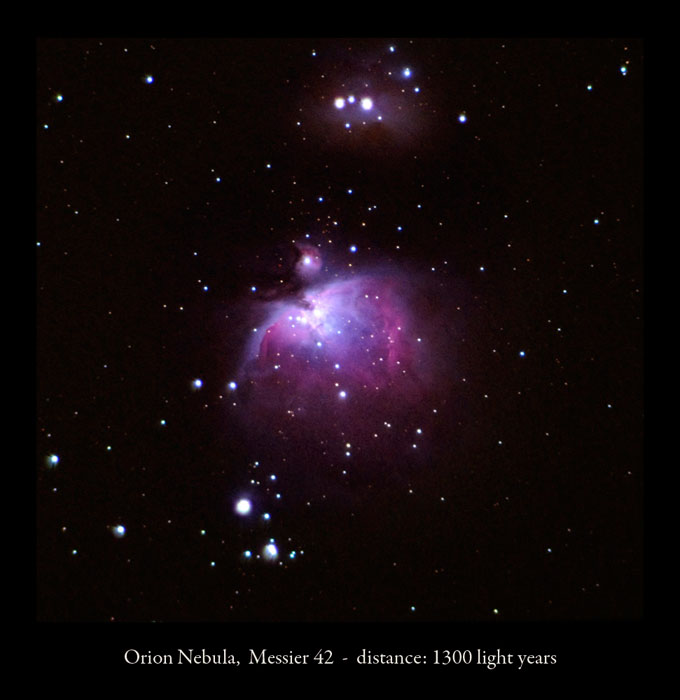
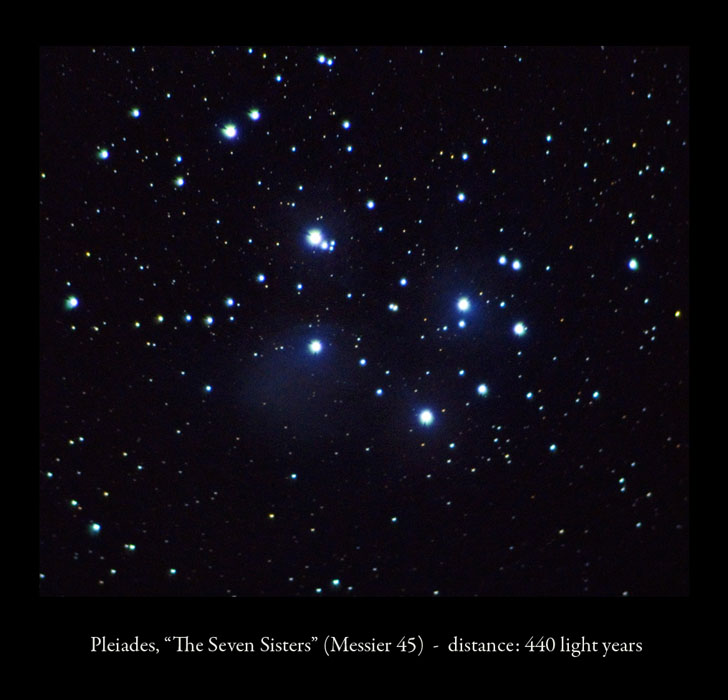
Most of us live either in or close to the city and with a few exceptions (notably the moon and planets), there is really not that much to see, let alone to photograph. On a clear night, we may catch a glimpse of the brightest Deep Sky objects like the large Orion nebula (M42) or the Andromeda Galaxy (M31); M13 in Hercules may offer a pleasant view, same with the Pleiades (M45). But compared to the wealth of objects that are visible once we get away from the big cities (even with a simple pair of binoculars), the skies above our living quarters usually offer remarkably little. For Deep Sky photography, you will be much better off with a small telescope at a truly dark site than a fancy 10-inch Schmidt-Cassegrain in the middle of a large city. Many expensive telescopes sit and gather dust for exactly that reason: their well-to-do owners never really took the time and effort to get the maximum out of their instrument.
A dark sky will allow for longer exposures and render images with higher contrast and much better detail. If you are in a big city, just try pointing your digital camera at the night sky (on a tripod) and open the shutter for a minute or so at f/4. Even at a moderate ISO 400, chances are that what looks like a fairly dark sky to your eye ends up being completely washed out in the photograph. Under those circumstances, there is no way to get a good image of your targeted fuzzies. Investing in a good quality Light Pollution Filter helps overcoming the problem a bit, but nothing beats the splendor of a truly dark site.
The Equipment
MYTH #3: you get what you pay for.
This is common wisdom, and when it comes to telescopes, it is entirely flawed. I know people who spent a small fortune on a telescope that they never really understood and were unable to work with. Years later, they’d be lucky if they could sell it on Ebay for a quarter of what they paid. It’s entirely possible to get good results from inexpensive equipment. More money does not always mean a better telescope. Often, it means a heavier and more complex instrument, so serious research is strongly recommended when buying one. What makes all the difference is knowledge and experience: knowing the constellations, understanding the differences between refractors, Newtonians and Schmidt-Cassegrain systems, spending lots of time studying the night sky… The truth is that a modest instrument in the hands of an expert will yield far better photographic results than a very advanced telescope in the hands of a novice.
Here is a list of the most basic equipment you will need:
- A small telescope with a short focal ratio (I used an inexpensive 80mm f/5 short-tube refractor for most of my Deep Sky images, you can often find them on Ebay for well under $100)
- A mount with a motor drive to track the stars (preferably equatorial, but up to 20 second exposures can be done with an Alt-Az mount)
- A DSLR camera (I like the new 24MP Nikon 3200 and the Canon EOS series; for $700 or less you are in business, $300 if you buy used )
- A T-adapter (prime focus) to connect the camera to the telescope ($25 or less)
- A T-ring specific to your camera ($15 or less)
- A wireless remote to trigger your camera shutter (keep vibrations to a minimum for $20 or so)
- A computer with stacking software (Deep Sky Stacker, downloads for free on the Internet) and Photoshop, any version is really OK
Most smaller telescopes are sold with a mount – for a novice, the GoTo capabilities on the inexpensive Alt-Az mounts will make finding the objects in the sky a lot easier. I highly recommend Cloudy Nights classifieds for used astro-equipment. Ebay is another great source.
The Shooting Process
I always prefer to set up my gear before sunset, when there is still a fair amount of light to see what I am doing. If you are lucky to live under dark skies, then you can shoot from your own backyard, but most of us will need to drive out for at least 20 to 30 minutes to be away from city lights. An open parking lot or campground, preferably with picnic tables is ideal. Make sure to bring some flashlights with red foil or gel over the front (red light does not affect your night vision, whereas white light does).
Set everything up in the most organized way, so you will not have to look for things later. If you are using an equatorial mount, you need to align it to the North Star (Polaris) to make sure the polar axis (also called right ascension) is parallel to the rotation axis of the Earth, see diagram.

A compass is very helpful in finding your general orientation before it is dark enough to see the stars. For most GoTo systems, you will also need a compass to point your telescope north at the start of your alignment. It is a good idea to know in advance which celestial objects you are going to photograph that night. Studying the night sky beforehand is essential and I highly recommend using planetarium software like Stellarium (free download). There are also many great books available, like Night Sky Atlas by Robin Scagell, for only $10 to $15 plus shipping on Amazon.com.
While it is still light, you attach the camera to the telescope, using the T-adapter for shooting in prime focus. You can use a faraway mountain or something near the horizon to focus on. If the moon is visible, that’s even better. If your camera has LiveView, you can zoom in on the display, that makes precise focusing much easier. Once you are in perfect focus, you lock the focuser with the lock screw. (In case your telescope does not allow locking the focuser, all you can do is tighten the mechanism so it feels pretty stiff and will not move by itself).
We will be needing so-called flat frames in the final processing of our images and this is a great time to shoot them. No optical system is perfect and especially with cheaper telescopes, the corners of your image are less bright than the center. A flat can be an image of an empty part of the sky, that shows nothing except the difference in brightness. Point your scope up well before any stars appear and take a few shots on automatic, ten is more than enough. The stacking software we use later will be using these images to subtract from the actual photographs, thereby correcting the differences in brightness. You can also put a white T-shirt over the front lens and shine a light though it, but I prefer this method.
Once it is dark enough to start shooting (usually about an hour or so after sunset), we need to find the Deep Sky objects on our shooting list. Locating those faint nebulas in the sky that look so rich and detailed in photographs is not easy at all, especially in the beginning. A good pair of wide-angle binoculars (7×50 or 7×35) is a fantastic tool to bring them a little closer and get a better idea of their position. Once you found them, it will not be too hard to center them in your telescope, using a good finder scope. You will definitely need a motorized tracking mechanism to keep them centered. Of course, if you are using a GoTo mount, it will find the object for you. It certainly makes life a lot easier, but it also creates a dependency; I am a strong advocate of learning the night sky and finding objects based on the position of the stars.
For Deep Sky objects, I usually set my camera to ISO 1600. You can go higher, but it adds more noise to the image. I like to shoot in RAW-mode, but setting your camera to hi-res JPEG files will work just fine.You will need to take a lot of exposures of the same image, at least ten or fifteen, which will all be stacked later in the Deep Sky Stacker software. The more exposures you take, the less noise will appear in the final processed image, which makes it possible to get more detail. If you use an Alt-Az GoTo mount, the maximum you can expose for is about 20 seconds before the stars will begin to show trails. With a simple (unguided but motor driven) equatorial mount you can go up to 30 sec or even one minute, especially if you are using your camera with a telephoto lens. The longer the focal length, the more difficult it will be to get pinpoint stars. Precise polar alignment makes a real difference.
At the beginning and end of each sequence of exposures (individual exposures are called subs), you need to shoot the so-called dark frames. Deep Sky Stacker will use these files to correct the inherent flaws of your camera sensor (the dark signal), which also depends on the outside temperature. A dark file is shot with exactly the same exposure as your subs, only with the lens covered. Usually 6 dark frames at the beginning and six at the end is plenty; if you need to move fast then three or four will do.
So by the end of our shooting session we will have a dozen flat frames (shot early in the evening), all our picture files (or subs), and a series of dark frames for each object we photographed. Finally, we need to create the bias frames by shooting ten or twelve shots at the very shortest exposure our camera allows (same ISO setting as the picture files), again with the lens covered. Take good notes about which frames are which, since you can’t tell much from a black image! All these files will be combined in Deep Sky Stacker to produce our final shots.
Images taken with 80mm f/5 short-tube refractor, focal length 400mm
These photographs were taken with my 80mm Rokinon short tube on my Meade Alt-Az mount, 12 to 15 subs at ISO 1600, exposed at 15 or 20 seconds, stacked in Deep Sky Stacker.
Click on image to see larger version:
Images taken with Nikon D300 with 180mm ED lens on an EQ-1 mount with motor drive
For these shots, the subs were taken at 30 sec each at ISO 1600, usually about 15 to 20 exposures per photo. Stacked in Deep Sky Stacker, further processing in Adobe Photoshop CS3.
Click on image to see larger version:


Processing
Deep Sky Stacker can be downloaded for free at deepskystacker.free.fr/. After loading the images complete with flat frames, dark frames and bias frames, we simply let the software do its amazing job. The image file we end up with will have most of the noise removed and probably show more detail than the single frames we started with. However, the image is far from done. It is only in the final processing that an image truly comes to life. To achieve that, we need a velvety black background, pinpoint stars (at least the small ones), rich color and plenty of detail in the nebulosity. I am amazed at the amount of online images that could be so much better if the techniques I am about to describe would have been applied to them!!
Here is an example of a very nice shot of the Horsehead and Flame nebulas, posted by an experienced astro-photographer who used Nebulosity 2 and Photoshop 4 to process the image:

Notice the wonderful detail (shot with a Astro-Tech 65mm f/6.5 wide-field apochromatic refractor and a $2000 S-BIG CCD camera, a beautiful set-up, with a total exposure of almost ten hours in five-minute increments).
However, the photo lacks a bit of contrast, the sky is not really black and the H-alpha clouds are pink instead of red. Also, in several places the gas clouds look yellowish and muddy.
Additional processing and sharpening in Photoshop reveals a stunning image:

Of course, it’s never perfect: some of the faintest nebulosity got lost here, so I could probably start again from scratch and try to keep all the thin filaments. The main point is that the final processing in Photoshop can make all the difference between a good photograph and a great one. Personal taste is an important factor, too: many astro-photographers prefer their skies dark but not quite black.
So which are the basic Photoshop techniques to bring out the best detail and color in your astro-photographs?
Let’s start with an example of my own Deep Sky images, the Orion star field.
Using an f/2.8 telephoto lens with a 180mm focal length on my Nikon D300, taking about 25 exposures of 30 seconds each at ISO 1600 (total exposure 12.5 minutes) gave me the following file after stacking the images in Deep Sky Stacker:

Nothing too exciting: we barely see the Flame nebula and the Horsehead nebula is completely absent. The background is a bit muddy and has a reddish brown cast. More than anything, it does not seem to show very much! One would almost discard the photograph as a failed attempt. This is typical of a stacked but unprocessed image. It holds much more information than you can see.
The first thing to do is to increase the contrast and improve the color. You can play with the Levels (Ctrl-L) and the Curves (Ctrl-M), but personally, I like to start with Brightness/Contrast (Image-Adjustments-Brightness/Contrast – top of the menu). I just keep sliding the cursors to the right until the hidden details start showing. If your version of Photoshop has Shadows/Highlights built in (also under Image-Adjustments), then moving those cursors can give you a good idea of the information in the file. The trick is to keep making the image brighter and then darkening the background by adding contrast.
Another helpful way of doing this, while at the same time removing a color cast, is using Color Balance (Ctrl-B, also under Image-Adjustments). At the bottom of the color balance window, where it says Tone Balance, click on Shadows. It will light up in blue. Then you choose the color you need to remove, in this case mostly red. By moving the red cursor to the left (adding cyan), not only do you fix the color cast, but at the same time the background becomes darker and more contrasty. I also moved the yellow cursor a little bit to the right (adding blue). It needs to be done subtly, but it greatly improves the overall appearance.
Finally, I go to Hue/Saturation (Ctrl-U, also under Image-Adjustments) and move the saturation cursor to the right, adding depth and color. Again, don’t overdo it; go as far as you can before it starts looking a bit artificial.

The new image is much better: color and contrast have improved and there is lots of nebulosity showing where before there was nothing. Even the Horsehead nebula is starting to show. A lot of people would stop here and many times I have done so myself. Yet, we can push the envelope even further.
One of my secret Photoshop weapons comes into play here: the Lasso tool. I always use it with a feathered edge, which you can set at the top of the menu in a little window to the left where it says Feather (after you click on the lasso tool). Depending on the size of the area you want to affect and the size of your original file you can set the feather anywhere from 3 px (for a tiny area) to 250 px (for a very large area). Usually, it will be anywhere from 10 to 50 pixels.
There is no way a regular DSLR could show a detailed Horsehead Nebula with these kind of short exposures (30sec x 25). So it’s time to get creative. In order to bring out the faint detail we have to isolate the nebula and work locally. It helps to look at a great shot of the object done with more advanced equipment, so we get a good feeling where to draw the lasso. Once we have defined the area with a nice feathered edge, we can accentuate the nebulosity by going to Levels (Ctrl-L) and moving the central cursor to the left, opening up the shadows. If the effect gets too muddy, we go to Brightness/Contrast and add contrast to darken the background. Now we can also play with the color: go to Color Balance (Ctrl-B) and add some red, maybe even a hint of magenta. We can further intensify the color by adding saturation (Ctrl-U) until it looks just right. Again, don’t push it too far!
Applying this technique locally for the Flame Nebula as well as the Great Orion Nebula to the right has brought out details that were completely invisible in the first stage. I used a little sharpening and increased the overall contrast a hair more to reveal the final image:

Two factors could significantly improve this photograph:
1. Using a modified DSLR with a much higher sensitivity in the H-alpha region would make the nebulas stand out even more clearly (more info at Hap Griffin’s website)
2. Using longer exposures (3 to 5 minutes each) would show a richness of detail that is impossible to get in thirty seconds. To further improve contrast at long exposures, a Light Pollution Suppression (LPS) filter is highly recommendable under less than perfectly dark skies.
Of course, we would be leaving the low-budget area here and move into a more sophisticated field of astrophotography. Longer exposures require a very sturdy equatorial mount with precise tracking and a high quality auto-guider. That will be my next stage of exploration.
Fun and Easy First Steps
If you are new to astro-photography, there are so many easy ways to begin. With a simple digital camera on a tripod, it is possible to take some very nice photographs of the stars. You need a camera that allows manual settings so you can use time exposures and keep the shutter open for at least thirty seconds. First set the focus of the camera to infinity. Then open the aperture all the way (usually to f2.8 or f3.5 – the smaller the number the wider the aperture). Point the camera in wide-angle mode to a bright part of the sky with lots of stars. Of course, you want to be far away from city lights, otherwise the results will be disappointing. Set your sensitivity to ISO 400. If you go too much higher (ISO 800 and up) the image may be noisy, especially on the less expensive cameras.
Now just open the shutter for 10 seconds, 20 seconds and 30 seconds. You can see how long you can expose before the stars become small trails instead of points. The rotation of the Earth causes the stars to move, so with a static tripod the exposure can’t be very long.
However, if you point the camera North and leave the shutter open for an hour or more (you need a very dark site to do that, otherwise the image blows out completely), the star trails will form beautiful concentric circles. Keep the ISO settings fairly low (ISO 200 or less) and you can even stop down a bit (to f5.6 or f8), so the background remains dark. It is surprising how much light a simple digital camera can gather in a few minutes.
If you own a DSLR with a fast lens (f/2 or faster), you can really get some good results without any tracking. All you need is a dark site and a sturdy tripod. With relatively short exposures you can photograph the constellations and even see some of the brightest nebulae and star clusters. If you use a wide-angle lens, pointed at the Milky Way in summer, you can expose up to 20 seconds before the stars show any trails. At ISO 1600, you can gather a wealth of information, especially if you take ten or more exposures and use Deep Sky Stacker to process the images. Even ISO 3200 can be used, because the stacking software will considerably reduce the noise.
The following images were taken very recently with a Nikon D300 at ISO 1600, using my 85mm f/1.8 lens (shooting full open). I exposed for only 4 seconds, taking about a dozen exposures stacked in Deep Sky Stacker, then further processed in Photoshop CS5. I was pleasantly surprised to see how many stars are visible of the Double Cluster in Perseus, as well as the Pleiades (M45), and how well the Andromeda Galaxy (M31) and the Great Orion Nebula (M42) are coming through. Even the Flame Nebula in Orion’s belt is showing (barely, but still!). The shot of Orion was composed of three images since my 85mm lens is not wide enough to show the full constellation. No tracking here, just a sturdy tripod!
Click on image to see larger version:


Piggy-back Photography with a Telescope
If you have a small telescope, especially one that has a tracking mechanism, you can mount your camera to the telescope and use the scope to track the stars while the shutter of the camera is open. This way, you can expose a lot longer before seeing star trails, especially with an equatorial mount. Because the axis of an equatorial mount is parallel to the axis of the Earth, it completely compensates for its rotation once your tracking and polar alignment are precise.
Overview of telescopes
There are many different kind of designs for telescopes, but most amateur telescopes fall into one of three categories:
- Refractors
- Reflectors
- Catadioptric systems
Refractor

A refractor is a simple tube with a lens (the objective) in the front and another lens (the eyepiece) in the back. Usually the front lens consist of two pieces of glass, each with a different breaking index to control false color (chromatic aberration). Those are called achromatic objectives. The best corrected and most expensive refractors are called apochromatic: they often have an objective that consists of three and sometimes even four elements. For astrophotography they are ideal, but again, they aren’t cheap.
Reflector
A reflector uses a concave primary mirror instead of a front lens:

A smaller secondary mirror under a 45 degree angle reflects the light outside the tube where an eyepiece can catch the focus point. This design is called the Newtonian telescope, invented by Sir Isaac Newton. A variety is the Dobsonian telescope, which is exactly the same design on a very simple and inexpensive mount. Because of the relatively simple construction and the large mirror size, these are great instruments for exploring Deep Sky Objects such as nebulas and distant galaxies, since they gather a lot of light.
Catadioptric
Finally, the catadioptric systems, such as the Schmidt-Cassegrain telescopes or the Schmidt-Newtonian telescopes, use a glass corrector plate in the front of the tube.

These are complex optical systems that have become affordable since they were mass produced by companies like Celestron, Meade and Orion. Their short build and large light-gathering capabilities make them ideal for observations of the moon and planets, as well as Deep Sky Objects. Since their effective focal length is rather long, they would not be my first choice for photographing faint nebulas and galaxies, but for imaging the moon and planets they are absolutely wonderful.